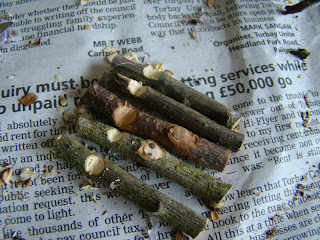
I went walking one day and picked up some twigs, they sat waiting for a while for me to do something with them for a while. So one evening recently while baby was asleep and the other half was out, I started trying to glue some of the twigs together. It wasn't very light and I got very glue happy and ended up with some furniture but didn't realise until the next day that it was awful! TUrns out you can;t just throw glue at it to stick it together. So I looked on the internet for tips on how to glue twig furniture together better but couldn't really find anything in detail, I came up with the ideas below and it works well so thought I'd put some of the things I discovered for others who may also be looking.
Here is the bad glueing! underside of a bench. (still to be redone!)
A badly glued chair.
So here is how I improved it, I broke the twigs apart again. Chose 5 twigs that were similar widths, and using a craft knife I dug out a groove that another twig could sit in. (shown below)
A rusty craft knife is fine!
I sanded down the twig to get as much of a clean surface. Using a minimal/yet enough amount of glue from the hot glue gun and get that twig in there quick before it sets.
I did the same on the other side and the seat for the chair is done
Turned over, you can see the 'seat' .The extra bits sticking out top and bottom are handy for slotting in the uprights/legs.
Here is upright twig in relation to the seat, it slotted in that top left corner of the seat square, I will try to show this better when I next make something. I used glue again.
To make the two back uprights/back legs I chose two thicker pieces of twig. I dug out two grooves that matched up with where it would meet the seat. this was a bit fiddly, I kept trying/ marrying it up to the seat and digging out more, until it fitted well. Below picture is the two knotches cut out with craft knife, one slightly above the other.
Here is the chair when finished, (note all the chipped bits lying around.) This one is wonky as the uprights were curved outwards but I like it's quirkiness.
I added a bar across the back of the chair, I cut little half moons out of the main uprights and rounded off the ends of the piece I chose to go across. It fitted in quite snugly, but again keep checking back to make sure you don't sand too much off.
The front legs were done in the same way as the back uprights
To make it stand up, you have to do a bit of sanding, trimming the feet to get it even.


Thanks so much for the helpful hints, I will try this.
ReplyDeleteGwen, I have used your tip and pictures on my fairyland bog. I have given you credit. If this is not acceptable, let me know. Here is the page:
ReplyDeletehttp://www.fairylanddiary.com/2015/04/pennant-garland-and-twig-patio-set.html
Oh how lovely and of course that's fine and thank you!
DeleteThanks, Polly. I read your other entries and now have an idea of who's who.
DeleteDo you place your furniture outside? How does it hold up to the weather?
ReplyDeleteHI Katie, this was made quite a while ago and it didn't really hold together for a very long time and it wasn't even outside! It was cheap hot glue however, so maybe that didn't help. Or perhaps it would need teeny tiny little pins/nails knocked into it to hold together. when I get some time to work on them I will again, just so darned busy!
DeleteOk I am glad that someone else had the same trouble as I did when trying to make this stuff. I can not even get rocks to stay together with super glue. Hopefully we both have better luck when we try next
ReplyDeleterubber cement, or you could make a mortar much like salt dough.
Deletehttp://thejuise.blogspot.com/2011/08/make-faerie-well.html
ReplyDelete